Category Archives: Uncategorized

Evaluation

Overall I am pleased with the outcome of this work. From where I began to what I have to show now has been an evolution of ideas. I had half of what I wanted to create at the beginning and as the project progressed I was able to build the other half from experience and research. I have tried some new techniques for making photography and art and I think I will be trying a lot of them again with different projects. I was a little disappointed to see I wasn’t as original with my ideas as I first though, but I also believe that it has stemmed from my own playfulness and practise with a way of photographing that I haven’t come across……yet.

My films will be something that I continue to look at and try to follow up. A major issue with them was technology and my lack of knowledge in using it. But the only way I’ll get any better is by practising and that is what I plan to do.

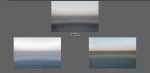
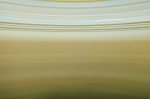
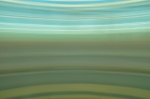
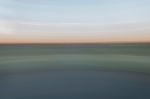
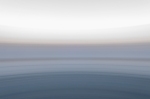
I am pleased with my final prints. I always wonder if I should have got them printed bigger and I think with these I possibly could. But for this crit I think A2 is a good size. If I was to display them I would probably try for A1 or A0 but I couldn’t find it finically feasible to print them that size at the moment. Yes I could have tried crowd funding, but like I said I don’t think it is right for me just yet. I’m going to see what reception this work gets and from there decide whether I want to try and fund it for me or perhaps enter it into competitions.

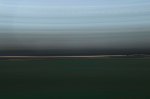
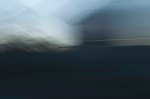
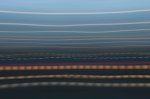
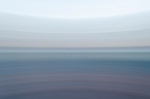
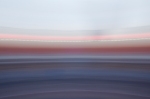
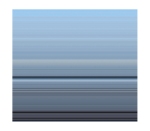
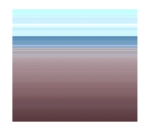
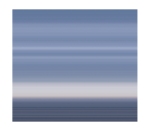
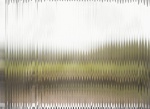
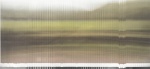
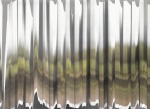
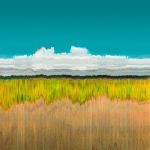
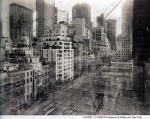
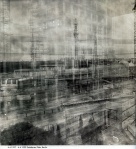
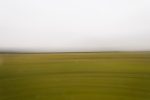
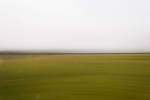
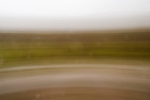
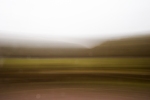
With my pictures there are a few things I haven’t covered. I think I could be asked why I kept the curve in the pictures and not tried to straighten them like other work. I like the curve. and not in a “‘why did you do this’ ‘oh i dont know because I like it'” kind of way. But because it has a purpose. If you look at the work long enough and use a little imagination you can lengthen the lines and you can see that they begin to wrap around you. I wanted to keep this as it shows how it is a 360 degree picture and now just a flat landscape. You are surrounded by an entire landscape but kept within a A2 sized rectangular frame on the wall.

Another point could be the rectangle shape. Why did I keep it a rectangle and not crop it down to a square like the photographers I looked at. I did this because I wanted to keep the feeling of a landscape. A landscape picture 9/10 will be horizontal and its the landscape idea that I wanted to keep in the viewers mind.

If I was to do this again I might possibly look into using analog. Just because you put yourself at risk and you dont know exactly what you are creating straight away which all adds to the excitement. I would also look into motors to spin the camera. Possibly setting up something like a pinhole camera and a motor to spin it and leaving it for a while to spin and capture a much longer piece of time within a landscape.

All ideas that I will keep in mind.


In all I am happy with my work and hope that it is received well.

Final Edits

I have done two final edits for my work and have had trouble choosing which to go with. I was actually on my way to the print bureau and thought I better check the resizing when I had a mad panic and started to re edit the pictures. So I am not left with two different sets which I have called Natural colour finals and bright finals.


Natural colour finals

Natural Colour Finals


Bright Finals


Bright Finals


I began by looking at both and really not know what to do. I asked a few people for there opinions but in reality I had already decided from the beginning which I wanted to use.

I chose to go for the more natural coloured pictures for a few reasons.

I edited the bright ones purely because I knew that bright would stand out, it didn’t mean though that they would be the stronger set of the two sets.

I was originally worried that the darker gloomier set would be to dank and depressing but as I looked at each picture from each set on there own I could see that the colours in the more natural set could easily hold there own especially if I printed them large enough which is what I plan to do.

As a set the natural set were a lot stronger than the brighter set. On there own some of the brighter pictures would be best but as a set they just didn’t hold together.

One of the main reasons I chose the more natural coloured set is purely for that reason. They have more natural colours. In the end I wanted to make it clear to the viewer that they are looking at a landscape still, even if it doesn’t entirely look like one. This I think is a lot easier to see when the colours haven’t been edited to the extreme like the brighter set.


I also played with a few other set ups but chose to include all 5 pictures because I think they can be viewed alone and as a set. I wasn’t 100% sure if I should use all 5 but I will just have to see if people agree that it was the right decision in the crit.


Other Set Ups


Shoot around Markeaton Campus

After my last shoot I was very pleased with the outcome. I quickly edited some pictures and am very pleased with how they have come out. I went out again not long after and tried the same techniques and processes.


Near Markeaton Park contact sheet


Although it wasnt a bad shoot I dont think it was my strongest either. Going over the photos it has a very dark feel to it and thats not something I want. I want and interested and calm feel rather than a dark and depressing one. I don’t think it was a failure, I think there were actually some pretty successful shots. I did experiment a bit in this shoot, I lowered the tripod as far to the floor as I could to see if this could change the view of the shots. I also played with wobbling the tripod slightly when spinning the camera which gave a very interesting wave pattern to some pictures.


I jdont think its what I want from my work though. I want something calmer and I am running out of time so don’t think I can experiment much more. I’m going to choose my finals from my last shoot and see what I can do with editing them.

Markeaton Street Campus and Brit Mill shoot

This is my retry at photographing with my 360 degree technique. I wanted to work somewhere that I felt comfortable and knew the area. This is because when I wasn’t happy with my pictures in the Peak district and I think that if I pull back to a more comfortable place I can take my time and really work on what I am doing. It is also where I photographed my abstract work before. That isn’t why I chose it but it is interesting it is where I am going back to. I chose it also for the amount of light it lets in, as mostly glass building it lets in masses of natural light and this is what I believe to be best for my photographs. I also took some pictures between Markeaton and Britannia Mill campus including aroudn Britannia Mill. I went at the weekend when it is less busy so I don’t have any people in the pictures and can focus on the area around me. I know that I have to photograph around 3 – 4pm as this is when the light is fading and just before sunset. I have found this is the best time as my camera will pick up more information and colour.

When I take the pictures I spin the camera in an anti clockwise direction. I don’t know why. I would like to say it is something about the earths rotation, or how the sun travels across the sky, but really it is just natural. I thought about spinning clockwise but it just didn’t feel natural to me.


Markeaton and Brit Mill Contact Sheet


These are actually edited pictures from the markeaton street campus and Brit Mill shoot. Not majorly edited, just mainly in bridge and camera raw with some dust and spec removal.

I shot them on a D90 with a wide angles lens, rather than my D60. I just wanted better quality and I wanted to use a wide angle lens purely so I could have more of the landscape in my frame. What I wasn’t prepared for that day was the lighting. The sun was just setting and the colours that were being created were amazing. Mixed with the colours of different things in and around the campus I was coming out with some great shots.

Throughout this shoot I was becoming inspired and I realised why I was taking these shots. Before my landscape and abstract work I found both genres of photography quite boring and didn’t see the point of them but now I really enjoy them and like working in them. I wanted to combine these two new exciting things to me and see what I could create. A lot of great art is made through the bringing together of other things. I wanted to take minimal and complex and meet them together, try and find a common ground for them both in the world of landscape and abstract photography. I like the idea of taking something that can be quite formal, like a landscape, and mixing it up. Land, horizon, sky and blur them together. You can sort of make out where one ends and another begins but it shouldn’t be simple. The building blocks are there but the detail isn’t.

I was also thinking about why abstract photography and art in general can be looked down upon but so many. Why is it that someone doesn’t like a confusing landscape or portrait or whatever it is. I’ve personally come to the conclusion that it is your mind not being able to calculate what it is you are seeing. Your animalistic behaviour wants to know what it is, why it is there, what are its intentions etc. Not knowing or not understanding or the unfamiliar, it is all scary and that is just the human in us. You will always want to know what all the pieces of the puzzle are and how they fit together and in the end what does that make.

LIMN – North Sea Series

LIMN is a fine art agency made up of three photographers. Nick Dunmur, Paul Harrison and Tracy Fryer.

The work I am looking at though is from a series called North Sea Series.

http://www.limn.mn/projects/north-sea-series/

It was shot on the North East Cost over a 12 month period and the pictures have been worked on in post production to simplfy them to there basic elements. The work is looking at our relationship with the real world and our imagined world and how we can look out at something to really look back at ourselves.

Sourced from:

http://www.limn.mn/projects/north-sea-series/


The work is quite similar to Rob Carters – Travelling Still

I like the work and its along the lines of what I want to create. It is definitely minimalistic and abstract. With quite a lot of work in post production. It is very crisp and clean with very exact splits in the colour. So much so that in some pictures you actually couldn’t be sure whether it is a photograph or not if it wasn’t for the explanation at the beginning.


The work is very interesting and bold and definitely has links to what I hope to produce. Once again I will keep it in mind when working on my own project.

Scanner Play

So I’ve taken inspiration from Ansen Seale and had a go at playing with some of my work on a scanner.

Scanner Play Contact Sheet


To create this work I would simply move the picture whilst it was being scanned. I would try different ways each time to see what effect it would have. They create some interesting pictures, things that you wouldn’t be able to produce in camera. It is also fun to experiment with different equipement and see what outcome I would get.

I like what I have ended with but I don’t think its what I’m aiming for. It is messy and just doesn’t stand out to me. I think it has potential but not in what I am doing at the moment. Scanning the actual landscape creates a much better effect than scanning a picture of it.

Ansen Seale & Michael Wesely

Heike also mentioned in our tutorial two photographers I should look at for my 360 degree picture work.

I have looked at both and they seem quite interesting.


Ansen Seale

Sourced from:

http://ansenseale.com/gallery.cfm?id=19


Ansen seale has a very original and unique way of photographing the world. He says that the camera ‘scans’ the landscape and has to be moved to work, usually by car, but also plane or train.It takes thousands of vertical slices in rapid succession.

The work is not like anything I have ever seen before. Not using a camera anyway. It is very much like a scanner in the way it looks. When you move something on a scanner you can sometimes get this effect but it is not usually desired. The idea of ‘scanning’ the landscape really intrigues me. And how it takes the world in horizontal slices is also very interesting. Our mind rarely works vertically and especially not when looking at landscape, it is almost exclusively seen horizontally.

My favourite picture out of these three is ‘Reality takes a U-turn’. The picture created by the camera is so interesting, yes it looks similar to a picture taken with a wide angle lens but you have to take into account how it was taken. The car was obviously turned around whilst the picture was being taken and the effect it has on the road going off into the distance and the vanishing point is amazing. The clouds and road just look like they are being dragged into a worm hole.

I love this work and it has definitely inspired me to try something myself. But I want to keep the strong horizontal lines in my work and not create to much chaos in the picture.


Michael Wesely

Sourced from:

http://photoslaves.com/open-shutter-by-michael-wesely/


Michael Weselys pictures are said to be the longest photographic exposures in the world. His work on MoMA in New York was exposed for 3 years whilst the buildings were torn down and rebuilt from 2001 to 2004. The pictures created are amazing in detail but also a mass of confusion as well. You can see the skeleton of what was and the finished product of what is there now all together in a single frame. In a way death and rebirth is intertwined and long periods of time are shown together as one moment.

His work is extremely inspiring in the fact that he has been waiting years for a single shot. But also the amount of time and effort he has put into practising and learning how long his exposures will need to be. To test a 3 year exposure you first have to try it for 6 months and work out how to not over expose a 3 year shot. Never has the term putting all your eggs in one basket been more photographically true.

This work is very interesting but doesn’t help my photographic practise for this module a great deal. It does remind me of my work at the start with the 4 point spin shots. the ghostly skeletons of structures layered on top of each other.I will keep this work in mind but I dont think I will use to much of it in my own work for this module.

Bike to Uni

After talking to Heike, I decided to keep going with both ideas and see what works out. Preferably I wanted to drive my car from Derby to my home in south oxfordshire and film the journey on either 2 cameras facing out to either side of the car or 4 cameras facing forward and backwards and either side of the car. This si doable but in the time I had I didn’t feel I could do it professionally. I’d need 4 high quality cameras and 4 ways to hold them up and steady in the car whilst I drove home. I insteaded decided to try and keep filming from my iphone. It had good quality video recording (the train video is lowered in quality post production) and can pick up decent sound. I didn’t think walking with it had been such a success so I wanted to keep to wheels just meaning it was a smoother ride. I decided to use a friends bike and see if I could film the journey from A to B on it. To do so I purchased a small gorilla pod with an iphone holding adaption which you can see below.

http://joby.com/smartphones/griptight-gorillapod-stand


The journey I decided to film was from my student house to kedleston road campus. I put the phone facing forwards not for an artistic reason but purely I felt it was safer that way by how the stand had been designed. I realise that my work is about the sides of a journey but this first video was primarily for testing the kit.

The video actually begins around the corner from my student house just because I had issues with the phone and stand and ended up beginning it there. So really it is from Junction street to Kedleston campus.


The strange vibrations and distortion is from youtube trying to fix the shake in the video. Im not sure if it adds or takes away from the video but like I said it is mainly a test.

Afterwards I didn’t feel the video was a success. Its interesting, but has been done before and also you can see I spend a lot of time adjusting the phone as it jolts forwards and backwards. I would love to have a GoPro, or something similar, which is built for these sorts of videos. But sadly I just dont have the time or money now and I think I will have to drop this video project. It doesn’t mean I wont pick it up again later. It just means I have postponed it for now.

Tutorial with Heike and The Derwent River Project

I had a tutorial with Heike online using google + and its hang out function. It was new and interesting and I can definitely see how it can help now rather than hinder.

I talked to Heike about my work and the troubles I was having with my 360 degree landscapes. I showed her what I had done and how I wasn’t sure it was strong enough. I brought back my video work and asked her if she thought it was something I could continue on with.

She said that although my 360 was interesting she could see where I was coming from. She also said that I should try to see what I could do with my video work but that I was running out of time with the project and that I needed to come to a decision soon. I knew I needed to choose one or the other but I didn’t want to do it just yet.

I’m going to try one more go with each and then decide what I will continue to use and use as a final piece.

I had become a bit stuck for inspiration for my video work and Heike pointed me in the direction of ‘The Derwent River Project’.

The Derwent River Project

http://vimeo.com/derwentproject


The Derwent River Project is a collaberation between two artists, David Stephenson and Martin Walch. It is looking at the Derwent river system and trying to create a new way to experience the landscape by giving the viewer to view the landscape as a full 360 degress. They have done this by using a tiled 4 channel surround video so you can see everything at the same time.

The videos are very interesting and give a perspective I havent seen before. It strengthens my ideas of a continuous landscape. Instead of a still image capturing one part, you are filming, capturing everything around. Instead of landscape photography, Landscape video perhaps.

Shoot in the Peak District

I had a mad rush of inspiration this morning and drove into the Peak district to make some pictures. I wasn’t exactly sure what I was going to do or where I was going to go but I got my things together and headed out. I ended up driving around the peak district exploring for about 7 hours. I have drawn a rough map of my journey and took panoramas of where I was as well as some of my 360-degree shots.

Map

Panoramas

Pictures

Peak District shoot contact sheet


Although I think I learnt a lot from going into the peak district, these pictures aren’t as strong as I’d hoped they would be.

They are incredibly dusty which is entirely my fault. I should have learnt to clean my lens and make sure I am creating clean pictures by now. I find the colour pallet sort of boring as well. I have also bleached out the sky to much. I am having issues when it comes to aperture and light, I am trying to photograph in the middle of the day with long shutter speeds and a lens that can’t get a small enough aperture. I think I need to photograph later in the day as the light is fading so I can capture as much colour detail as I can.

I think I need to expand from this. Possibly going into the peak district wasn’t a good idea and I need to find somewhere else to photograph. I will think this over but it has made me question whether to keep going with the 360 degree pictures.